Those of you who grew up in the 80s and early 90s probably remember Logo, an educational programming language that used a “turtle” to draw. Users would use simple commands to move the “turtle” around the screen and the PENUP and PENDOWN commands allowed users to draw as the “turtle” moved.
The Scratch programming language of today is an evolution of Logo, but in the past thirty years computers have evolved too. Kids of today are more likely to code a multi-level platformer than code an arrow to draw as it moves across the screen. Thus, Scratch’s powerful pen tool is often overlooked.
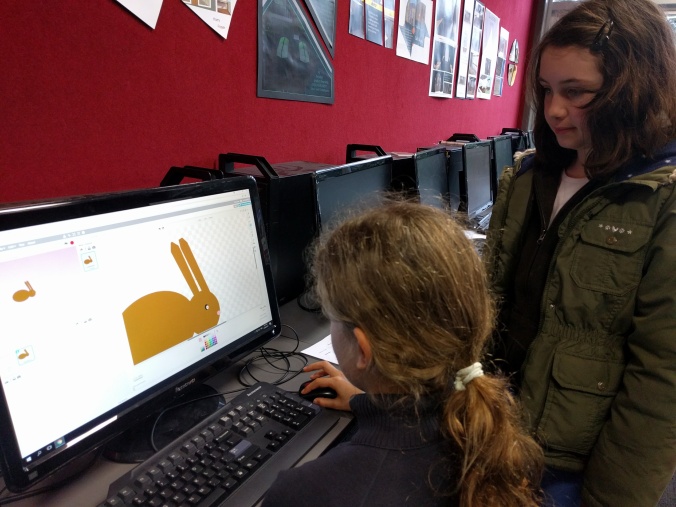
This week Girl Powered Coders were introduced to the power of the pen! Students were challenged to create a drawing app that allows users to change the pen colour.
Naomi uses Scratch a lot at home, but she had never used the pen coding blocks before. “I really liked using the pen tool. I’m still working on pen colour.”
Adam “felt really good with making the colour change to pink, but now I’m trying to change it back to green.”
Looking back at the past year I realised in some ways I was dictating too much of the creative process to my students in a hurry to make sure everyone was on the same page. I was eliminating the struggle and creative process. MakerBox is all about creativity and learning through doing. Process over product. Mistakes are to be celebrated, ideas to be shared, and obstacles to be overcome.
For Term 4 I set out to get back to the basics. For our very first Recycled Robots project I decided I would introduce the students to the concept and show some examples, but it was up to them to figure out how all the individual components fit together to make a drawing robot. I also brought back the Innovation Board, a space for us to share innovative ideas that we think might be helpful for other students.
Innovation: using a window as a lightbox to trace
On the first day, I was a bit scared. There was a great sense of uncertainty, what if my grand plan didn’t work? Ironically, I was worried about (gulp) failure.
At first the kids were a bit uncertain as well. They approached the supplies table with caution and not much conversation. But eventually they got to work and the end results were amazing! Every single bot was different and the kids came up with many ideas my boring adult brain never would have. Ideas they probably would have never articulated if an adult was walking them through the steps.
Robot builders at work
Googly eyes are always a great addition
Drawing bot with marker holders
Mesmorised by moving robots
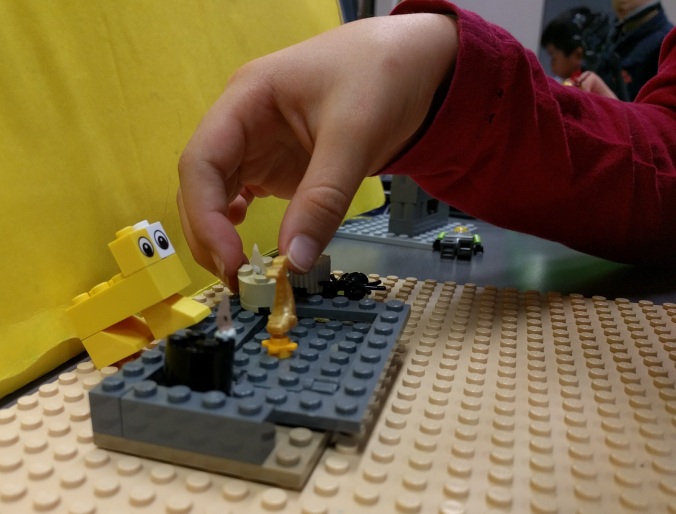
Caitlyn had the idea to use straws to hold markers on for easy removal and switching of colours. She cut straws to size, then made a straight cut, she then hot glued the straws onto her robot.
Other students saw this idea and decided to replicate it. Natalie found the straw was too small to hold the thick marker she wanted to use, so she remixed Caitlyn’s idea by wrapping a pipecleaner around the pen then hot gluing it to her robot.
The best part was during reflection time at the end. One student would say something about what didn’t work and how they fixed it and their peers would chime in with an “oh yeah!” or “that happened to me too!” The students were listening and engaging with what their classmates were saying and learning in the process.
During the second session I had to return to my teacher role so the kids understood how to connect the Hummingbird and components together, then code an LED using Scratch. There was a bit of self-discovery, but it was more structured then the previous week.
In the third week though, I made an active decision to focus on facilitation over lecture. I told students they were going to learn about three more types of output: motors, servos, and tri-colour LEDs, but I wasn’t going to tell them how to code these components or what they did.
As a class we quickly reviewed how to plug the components into the Hummingbird brain, then they were off!
Showing code and it’s results to fellow classmates
Exploring motors, servos, and tri-colour LEDs
Showing code and it’s results to fellow classmates
It was amazing! Every group ended up coding their components in 30 minutes or less. The servo tripped everyone up the most, “It worked once, but then it stopped! Everything else is still working though”, one group remarked. After some careful questioning, “So you told it to go to 70°, then what?” they all realised the servo was now at their chosen angle and couldn’t go there again until they told it to go somewhere else. They immediately set to work, remedying the problem.
Students interact with teacher-made robot to determine how it works
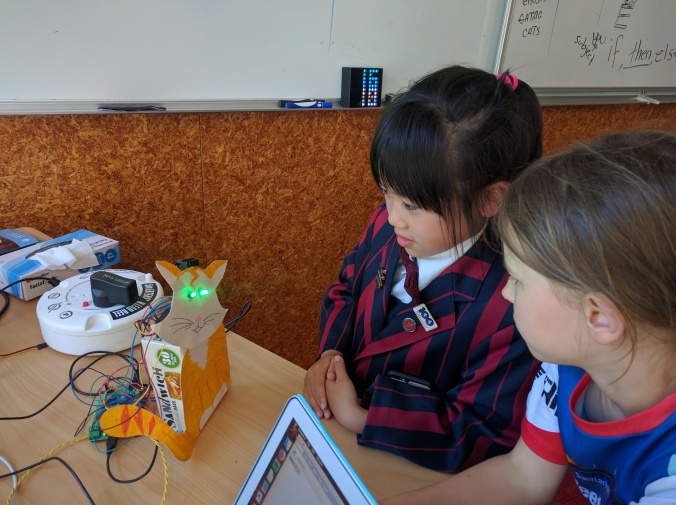
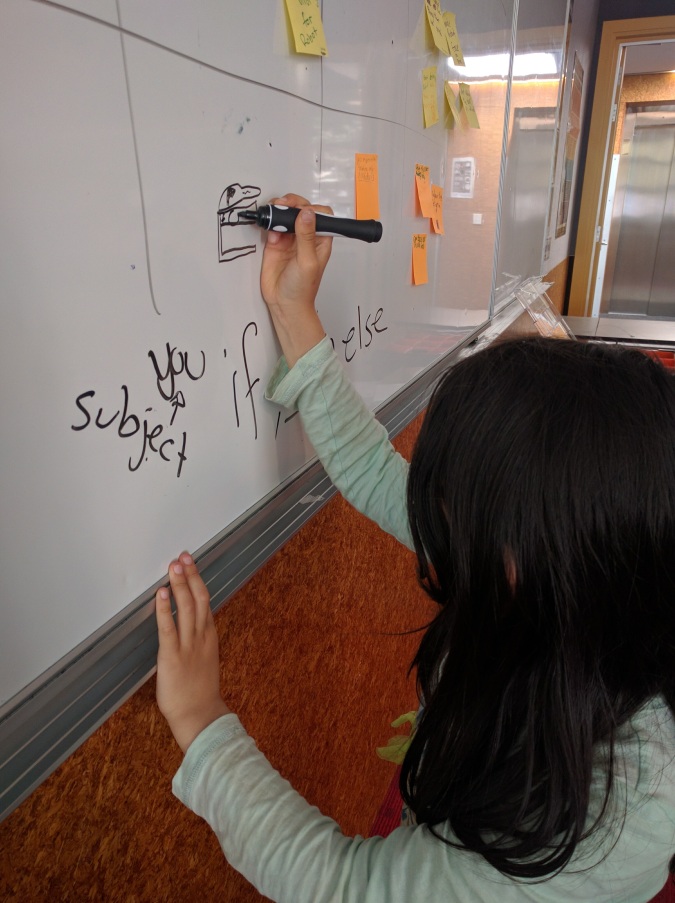
In later weeks sensors were a trickier component to understand. Sensors are different from output. Output is the way a robot reacts, a simple action, but sensors are how a robot gets input from the world around it. To code a sensor requires a bit of maths and a lot of logic.
Student draws code blocks needed for “if, then, else” statement
To add sensors to their robots the students had to know how to use greater than, less than, as well as if, then, else statements. We played multiple games to help us understand how robots respond to sensor input.
In the end, Recycled Robots 2017 was a complete success. The kids explored with more passion and even learned how to manage themselves in groups. By giving students the opportunity to learn new things for themselves and share with others discoveries were more personal and creativity was at it’s highest. I can’t wait to see what this creative bunch will get up into the future.
I’m excited for what 2018 will bring, starting with the revamped Game Design Adventures.
After the intensity of Python video game development we thought the Wednesday gang could use a mental break and decided to end the year with Digital Video Editing.
Most people don’t know this, but the MakerBox team actually studied film and video production at university, not digital technology. It was exciting to get back to our roots and show the younger generation how to manipulate time and space through the art of editing.
Over eight sessions we viewed various short films and scenes from 1895 to today. Students were shocked at how far filmmaking had come just between Workers Leaving The Lumière Factory in 1895 to Life of an American Fireman in 1903.
We even had our own “Psycho Shower Scene” moment. (If you recall audiences in 1960 were shocked by the shower scene which implies violence through editing, even though the knife never pierces the actresses skin and is quite tame by today’s standards.) In viewing Dexter’s Morning Routine the students had very strong reactions of shock. Shea even commented “Everything is gruesome!” In the scene itself we watch a man going about his morning routine, shaving, getting dressed, and eating breakfast. But through clever close ups and skillful editing these mundane tasks are given a more sinister feel. That’s the power of editing! To make audiences feel something or believe something happened without ever showing it.
After the history lesson we got hands-on editing three videos using DaVinci Resolve. A quick poll showed everyone had some prior experience of video editing, whether through Windows Movie Maker or iMovie. Luka was very excited to learn how to make more precise in and out points using keyboard shortcuts, a trick that is applicable to most editing software, including iMovie.
Classic editing pose.
For our first project we re-edited Life of an American Fireman to suit modern tastes. Each student chose what this meant to them. Some used colour filters to alter the black and white footage, while others cut down shots that went on too long. Afterwards, Zach noted that “by moving around and cutting clips, you can create an entirely different story.”
With a bit of editing under their belt, we moved on to filming a short script. The students learned a lot about how to use the camera and watch for continuity. Some pain points were making sure the camera was in focus, watching for continuity in the scene, and getting enough footage so you have options when editing.
The planning process
Students also learned to adjust shots to either react to an actor or to influence how the audience might feel about a character. For instance, when Shea “noticed in the storyboard, this character was kind of slouched”, he chose a high-angle to emphasize the character’s feeling of dejection and defeat.
When it came time to edit, everyone had their own unique interpretation of the same footage. No two videos are exactly alike. Finn in particular was more interested in manipulating the footage than cutting it. He wanted to superimpose memes onto his footage, but many memes use copyrighted material. After failing to find creative commons licensed images he wanted to use, Finn took matters into his own hands and created his own images in Krita. It was awesome to see him using a tool he learnt back in Term 1 to problem solve in Term 4.
Some other students decided they wanted to add titles to their films, but didn’t know how. Many decided to create their desired titles in Paint, then import the files into Resolve. Others were able to find the title feature within Resolve, then share that knowledge with their peers.
Out of everything we did this term, I was most excited to see how easily students shared knowledge, worked together, and problem-solved without any adult intervention. It’s clear they are all growing up and ready to take on whatever high school throws at them.
At MakerBox we strive to teach process over product. Having a fancy game is worthless unless you actually understand the code that makes it work. Even more important is thinking critically so when you end up with a bug in your code (which you will) you can use logic and problem solving skills to fix it.
In Level Up this term we focused on developing these skills along with self-confidence. We began the term by looking at a simple video game the students then had to recreate on their own using skills they learnt in Adventures in Game Design. As a class students identified the basic game mechanics used:
Objective: Get to the goal before the enemies touch you
From there students could play the example game as many times as they liked, but they were not allowed to look at the code. Instead they had to draw upon their own knowledge and deductive reasoning skills to find the answers.
For the following two weeks we developed video games that use web cameras to add a level of interactivity. Players use their bodies as the controller, instead of a mouse or keyboard. It was here we began to have some confidence issues. When trying to recall a script they already knew they would immediately ask for the answer or worse, immediately give up, instead of trying to work through it on their own or with a classmate.
The problem wasn’t knowledge, it was confidence. I never outright gave the answer, but through asking questions such as “What do you want your sprite to do?” and “What type of code block do you think you need to make your sprite do that action?” students always found the answer on their own.
As the course progressed emphasis was placed on four key areas:
Active listening
Thinking through problems before asking for help
Helping others/collaborating to solve problems
Looking at issues as a whole class
By the last session we had students jumping out of their chairs to help their fellow classmates. Sometimes even with the whole class looking at code it was hard to find the answer, but usually it was something quite small that had just been overlooked, like a missing forever loop or two code blocks in the wrong order.
Students consulting on a sprite for their collaborative game
It is uncomfortable sometimes, but accepting mistakes and working through them is such an important part of the coding process.
Students should remember no one is naturally good at coding. The only way to improve coding skills is through practice and lots and lots of mistakes! Even professional coders end up with buggy code, but they never give up and that’s what’s truly important.
All the projects from this term are available online. If students wish to continue working on their games they can either download their projects to their home computer or fork their projects using their personal Scratch account: scratch.mit.edu/users/levelup2017/studios.
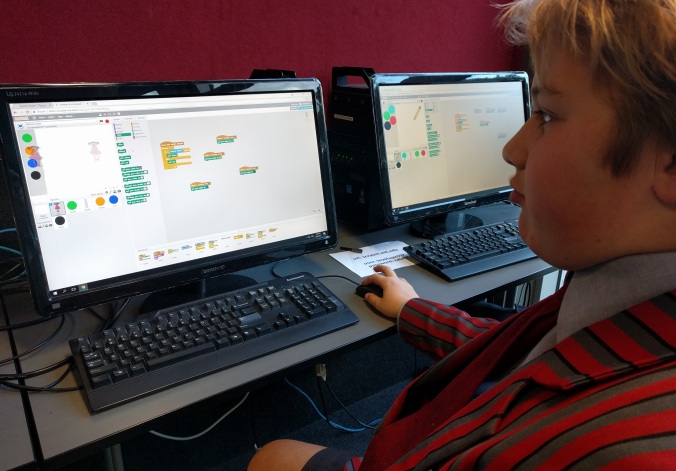
It’s been an intense year for our junior youth at Rata Studios. Term 1 found them creating graphics and planning levels for a future video game. Terms 2 and 3 had them building their own video games from scratch with the Python programming language.
All students had some previous coding experience, whether with Scratch, HTML, or some basic Python, but the past two terms stretched them considerably with awesome results. In Term 1 students were walked through the basics of coding with Python, starting with creating a simple dice roller game and simple drawings with Turtle, before moving on to creating platform games using PyGame.
Previous knowledge of coding via Scratch gave students the vocabulary and basic logic skills to understand what was happening with Python, even if the process was a bit different.
The three most important terms we learned in Python were:
Class – an object containing variables and functions useful for the class. (Player and Enemy are examples of classes) We use classes to help make our code more organised.
Function – usually, but not always, goes inside of a class. Functions can be called later on in the code. All functions begin with the keyword def, for define.
Variables – a value we don’t know yet and/or a value that can change
At the end of each session code was uploaded to the GitHub website. Students learned how to commit their changes as well as file and resolve issues. When creating issues it is important to be very specific so the reader understands what isn’t working in the code. The best bug reports require an understanding of what is going wrong in the code and a strong description of how the issue is presenting itself.
“What is GitHub actually used for?” – Finn
GitHub is used by professional programmers exactly the way we used it in class, to store, share, and fix code! Students interested in working as programmers should continue to use their GitHub accounts as it will be an asset when they apply to future jobs. Contributing to other user’s GitHub projects is also an excellent way to increase your programming skills.
By the end of Term 2 students began to see patterns in their code. Term 3 took a significantly more self-guided approach where each student worked at their own pace and were encouraged to think critically about the code needed to further develop their games. There was much protest the day we stopped providing answers and began providing open ended prompts, no one thought they would be able to create loot entirely on their own. After a few false starts, students started collaborating with each other, trading knowledge, and working off each other’s strengths. Once a small handful of students figured loot out, they were able to assist others who were still stuck.
This is what coding is all about. No one is naturally good at programming and it’s impossible to memorise every keyword, but through practice, collaboration, and asking heaps of questions we learn how to think logically and find the answers to our problems.
When we began this series of courses I honestly wasn’t sure how it was going to go, but now that we are at the end I couldn’t possibly be prouder. The students produced amazing work over these three terms and showed real commitment and dedication to their individual projects. It takes a great deal of effort to commit to a project for such a long period of time, but they tackled the challenge head on with excellent results.
All code created this term is available on GitHub under a GNU General Public License. You can view all our repositories at: github.com/MakerBox-NZ
Awesome animators returned to Rata Studios this term for Clay Animation. This time we looked at emotions, movement, character creation, and morphing. Morphing was a clear winner with nearly all animations incorporating some morphing element, from sentient swords to flying poo.
We also watched a wide variety of animated shorts for inspiration. The one short that captured everyone’s imagination was Fade by Josh Lopata. Fade is a traditional stop-motion animation with wire puppets covered with latex. The students were enraptured by the story and had many inquiries and thoughts about the filmmakers stylistic choices. It was awesome to hear them comment on the animators use of size and space to illicit emotion. They were really thinking about the film in a critical way.
Our final animations were set to music this time, before students even began planning their animations we listened to four songs. As a class we discussed how each song made us feel and what type of animation might fit with the music. From there students sketched their animations onto storyboards and began creating appropriate characters. Emerson immediately had a vision for the fast-paced Ultra Polka and set to work creating a brightly coloured cat to dance around the screen. Whereas Adam and Mattias set about making an epic battle movie using Killers as their soundtrack. All songs used are available from incompetech.com and under Creative Commons license.
During the last session some students happily expressed though they liked LEGO animation, they liked using clay even better because it gave them the freedom to create anything they wanted.
Another term of LEGO Animation at Rata Studios has come to an end and boy was it a blast! This wild term was filled with creative parodies, helpful classmates, and sparkly blood.
Students discovered they can use coloured paper and tape to alter LEGO mini-figures to look like any character they can imagine. This technique opens up the possibilities for creativity and can be applied to LEGO bricks as well.
Because many LEGO sets feature well-known movie characters, we spent two sessions exploring the difference between parody and simply copying another person’s work. The end result was a number of amusing animations that turned classic stories on their head, often with murderous conclusions!
Students imagine: What if the step-sisters dislike Cinderella because she murdered their brother?
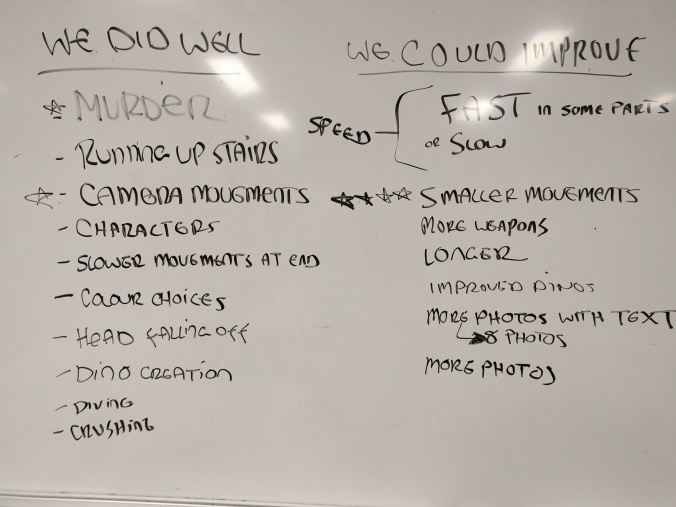
Death was a running theme in many of the animations this term. In one of our feedback sessions, “murder’ was cited as the top thing everyone did consistently well. Other top skills included character creation, running up stairs, and camera movements. Whereas many students felt they needed to work on making their animations slower by using smaller movements and taking more pictures.
As the course progressed, many students who were previously shy began coming out of their shells. It was wonderful to see them engaging with one another and sharing their ideas. On multiple occasions, I saw students voluntarily trading characters and animation tips. Sharing ideas is such an important (yet difficult) part of working in a creative environment, it was great to see it happening.
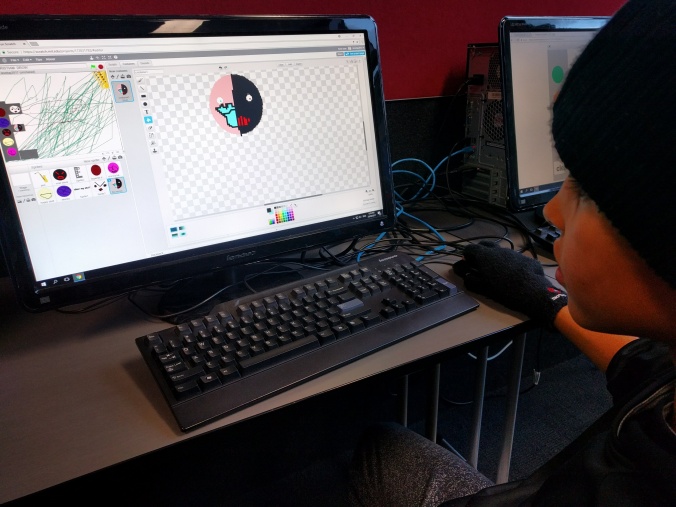
Last term students got drawing with Krita, professional, open-source digital painting software. Over eight sessions they learned best practices for creating digital art and designed their own 2D graphics for a future video game.
A big part of knowing how to design a video game comes from understanding their history and looking at games already on the market. Many discussions were had while viewing art and levels from popular games such as Super Mario Brothers, Portal, and BattleBlock Theatre.
After looking at what has come before them, students came up with concepts for their own original games. Once they had an idea of the storyline and objective they sketched out what the first level could look like. This included deciding all the assets that would be needed for gameplay, such as obstacles, non-playable characters (NPCs), and loot. They then had to decide which objects needed to be individual assets and which could be a part of the background.
All the students agree one of the most difficult parts of learning Krita was remembering to use layers. They saw the value in it, as one student remarked:
It is definitely worth using layers if you want to delete a certain part of your characters without deleting the whole thing.
– George
However, everyone said it was difficult to remember this when they were in the midst of their creative flow. With all things, practice makes perfect though, and half the class did say they used layers for their final assets.
Students left the class with a Dropbox folder full of assets that can be used as graphics in future Scratch or Python games.
[This class] gave you freedom. Sometimes at home you don’t have time to draw, this gave me time to draw, to think about what they were. I was working on another project while doing this and I designed some sprites and backgrounds for that project.
– George
I like how it gave you freedom so it just made your brain think about ideas and just came up with whole new concepts.
We had a small but dedicated group of eager animators in Mixed Media Animation at Rata Studios this term. Over eight sessions they learned to make the impossible possible using various mediums and stop-motion animation.
During each session we looked at the work of animators that helped define the genre, from Will Vinton, Norman McLaren, and Terry Gilliam. We also explored modern artists who have made their mark online, such as PES, BLU, and the comedic duo, Rhett & Link. Anyone familiar with these animators can see how they influenced the work of the kids.
In the final weeks two students finished working on their final animations and were looking for work to do while their classmates finished their final animations. I showed them how to import videos into iMovie and add title cards. This is the first time a final animation video was edited by students! They did an excellent job of it.
Editing the animation show.
Capturing photos for the pixilation.
We ended the class by making a pixilation. Pixilation is a style of animation in which real people are animated, not inanimate objects or drawings. It takes a lot of patience, but the effects you can achieve are pretty cool. Watch our pixilation to discover students who can teleport, disappear, and even fly!
Over the course of eight weeks students discovered how to make the web their own. Some web builders had prior knowledge of HTML (hypertext markup language) and CSS (cascading stylesheets), the languages of the web, but most were complete novices.
This class was different from most as we worked on one project the entire term. In the second session we began planning out what our website would look like and what it would be about. Every website was completely different!
HTML Tag Challenge!
Tags must be placed in the correct order as quickly as possible.
For the first few sessions our sites didn’t look all that interesting, they had pictures and text, but when we were just using HTML all the content ran down the side of the page in a straight line. Then we learned how to add CSS to style our HTML and things really began to take off. With CSS we were able to tell content exactly where we wanted it to appear and we were able to even add colour and different fonts.
Because we were working on one large project and every website was unique, there was a lot of self-guided learning taking place for more advanced tasks. Two students wanted to implement quizzes into their sites, but they both went about doing so in different ways. The one used an external quiz site to create, then embed, his quizzes while the other coded his quizzes using Javascript. Another student wanted to give users the ability to change the background colour of his website and used Javascript and buttons to accomplish this.
Working together to find a bug in the code
Peer reviewing each other’s websites
Apart from learning how to code for the web, we also learned how to use the web responsibly. During a lesson on how to tell if information found online is true, the students were most interested in knowing how theycould be good sources of factual information. Through all of our sessions we endeavored to use only Creative Commons licensed content.
Exif_JPEG_420
Exif_JPEG_420
Creative Commons licensed works allow anyone to use the work without asking permission. When you see the Creative Commons logo, you know permission has already been given. We discussed the difference between photos that are Creative Commons licensed and photos that show up when you do a Google image search, which despite common perceptions are usually not free for anyone to use.
It was an amazing term and I am very excited to see what this creative bunch comes up with next. Their websites can be remixed over to their individual Mozilla Thimble accounts or downloaded as .zip files.